LINCS LITTLE HENS - Hen jumpers
Hen rescue
More about the hens
Help !!!
Rescue procedure
Housing
Essentials
Shop
Hen Clothing
Sponsor a hen
Sponsors/Thanks
Links
Contact
Rehomed hens
Our Pictures
Photos
Photos2
Pet versus Battery hen
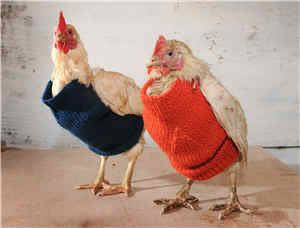
After many requests, here is the pattern for the hen Chux Tux and also the video from Youtube of Jo, the founder of Little Hen Rescue demonstrating them on Channel Five news.
This Battery Chicken Jacket was designed by Brigitte Hawley, from Benenden, in Kent. This bespoke design won a national knitting competition.
Basic Chux Tux
Abbreviations:
k: knit
p: purl
k2tog: knit two stitches together
tbl: through back of loop
st: stitch
rt: right
Use up your odds and ends of wool. It probably takes about one ball in total and about six hours to knit
Using size 3.25mm-4mm needles and double knitting wool.
Cast on 100 stitches.
Work 20 rows k1p1 rib.
Start decreasing, right side of work is facing you.
Keep the continuity of the rib pattern throughout.
Rib4, k2togtbl, rib26, k2togtbl, rib31, k2tog, rib27, k2tog, rib4 (96st)
3 rows rib maintaining pattern.
Rib4, k2togtbl, rib25, k2togtbl, rib29, k2tog, rib26, k2tog, rib4 (92st)
3 rows rib
Rib4, k2togtbl, rib24, k2togtbl, rib27, k2tog, rib25, k2tog, rib4 (88st)
3 rows rib
Rib4, k2togtbl, rib23, k2togtbl, rib25, k2tog, rib24, k2tog, rib4 (84st)
3 rows rib
Continue decreasing but only in the centre of the work
Rib28, k2togtbl, rib23, k2tog, rib29 (82st)
3 rows rib
Rib28, k2togtbl, rib21, k2tog, rib29 (80st)
3 rows rib
Rib28, k2togtbl, rib19, k2tog, rib29 (78st)
1 row rib
Rib28, k2togtbl, rib17, k2tog, rib29 (76st)
1row rib
Rib28, k2togtbl, rib15, k2tog, rib29 (74st)
1 row rib
Continue decreasing like this until:
Rib 28, k2tog tbl, p1, k2tog, rib29 (60st)
1 row rib
Rib28, slip next st onto rt needle k2tog, pass slipped st back over to cast it off, rib29,
(58st)
Continue without further shaping, k1p1 rib for 15 rows
Cast off loosely, in rib, in slightly smaller needles if possible.
Adjustable neck fastening.
Cast on 11sts
k1p1 moss stitch for 5 rows
6th row (working button hole)
work 6 st in moss st, cast off the last st worked (on the rt needle slip the 5th st worked over the 6th st)
work 1 st from left needle, pass the 5th st over the 6th st as before
work 1 st from left needle, pass the 5th st over the 6th st
moss st 3 remaining st.
(4st, gap for button hole, 4st)
7th row
moss st 3 st
next st, work into front but do not cast off needle, pass wool to back of work, and make second st into
the back, do not cast off, bring wool to front, and work third st into front, do not cast off, wool to
back, work fourth st into back of original st.
With 7 st on rt needle now release it from the left needle
work remaining 4 st from left needle in moss st (11st)
k1p1 moss st for 5 rows
repeat 6th row
repeat 7th row
k1p1 moss st for 5 rows
repeat 6th row
repeat 7th row
k1 p1 moss st for 2 rows
next row k2tog tbl, moss st 7, k2tog (9st)
next row k2tog tbl, moss st 5, k2tog (7st)
cast off in moss st
To make up
The wide end of the body shape is the tail end, the narrower end is the head end.
On main body of Chux Tux, sew together the first 20 rows of rib (at the wider end of the shape) only, to form a short tube, but leave open the rest of the garment.
Attach the cast on edge of the neck fastening to the side of the tux at the top.
Sew a button on the other side.
Deluxe Chux Tux
Make the basic Chux Tux and add the "Warming Flap".
Warming Flap
Cast on 25 st.
k1 p1 moss stitch, until work measures 14 cm
Next row, keeping continuity of moss st pattern
moss st 4, k2tog tbl, moss st to last 6 st , k2tog, moss st to end (23st)
next row, moss st
continue decreasing in this way (one decrease row, one moss st row) until 11 st remain
next two rows moss st
now work 6th and 7th row of adjustable neck fastening
moss st 5 rows
work 6th and 7th row of adjustable neck fastening
moss st 5 rows
cast off in moss st
To make up
Sew bottom (cast on edge) of Warming Flap to the cast on edge of the Tux placing
it centerally over the short back seam.
The Warming Flap adjusts and does up using the same
button that secures the neck fastening.
Fitting Instructions
These are fitting instructions from Brigitte Hawley from Kent, who designed the jacket:
One person holds the chicken at ground level,with both hands wrapped around her body restraining her wings. The second person faces the chicken and gathers the Tux up (as if it were a sock or a leg of a pair of tights) and puts the Chux-Tux over the chicken's head and over the first person's hands, so that it is well down her body but in front of her legs. The first person, with the second person's assistance, then gently manoeuvres one wing at a time, though the opening so that both wings are outside the Tux. It is very important that whilst you are handling the chicken's wings and she feels your grip loosen to free the wing, that she does not flap and try to escape at this point, as she would easily be injured.
Once the wings are out, the second person adjusts the fastening to a comfortable fit. Carefully release the chicken. and observe her to make sure all is well. To take the Tux off, simply undo the button and slide the Tux off the back of the chicken, so as not to ruffle her feathers, making sure her legs are not caught in the garment. Again, this is best done by two people although you can see on the video that Jo can easily fasten one by herself.
If the 'Chux-Tux' is used as soon as the chicken is rescued, she may get used to it.
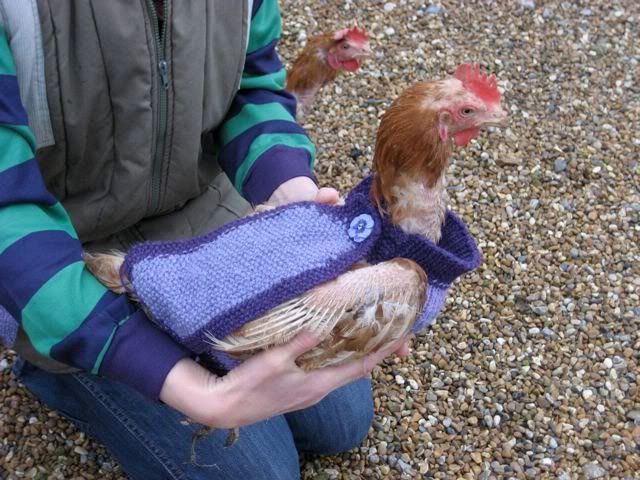
The design was then adapted to produce the 'Deluxe Chux Tux' with the added back warming feature . A few of the rescued battery chickens have very few feathers indeed and are often referred to as 'oven readies', they seem to have left only the larger flight feathers on the wings and a few stubbly tail feathers so as well as having a bare chest and bottom they also have a bare back and they really shiver in the cold. These chickens need the extra protection of the Deluxe version. When fitting the Deluxe version, simply button the Warming Flap down after the wings have been eased out, using the same button that holds the neck fastening. At first sight, the Warming Flap may appear too short but when in place, it adapts to the shape of the chicken's back.
The design was then adapted to produce the 'Deluxe Chux Tux' with the added back warming feature . A few of the rescued battery chickens have very few feathers indeed and are often referred to as 'oven readies', they seem to have left only the larger flight feathers on the wings and a few stubbly tail feathers so as well as having a bare chest and bottom they also have a bare back and they really shiver in the cold. These chickens need the extra protection of the Deluxe version. When fitting the Deluxe version, simply button the Warming Flap down after the wings have been eased out, using the same button that holds the neck fastening. At first sight, the Warming Flap may appear too short but when in place, it adapts to the shape of the chicken's back.